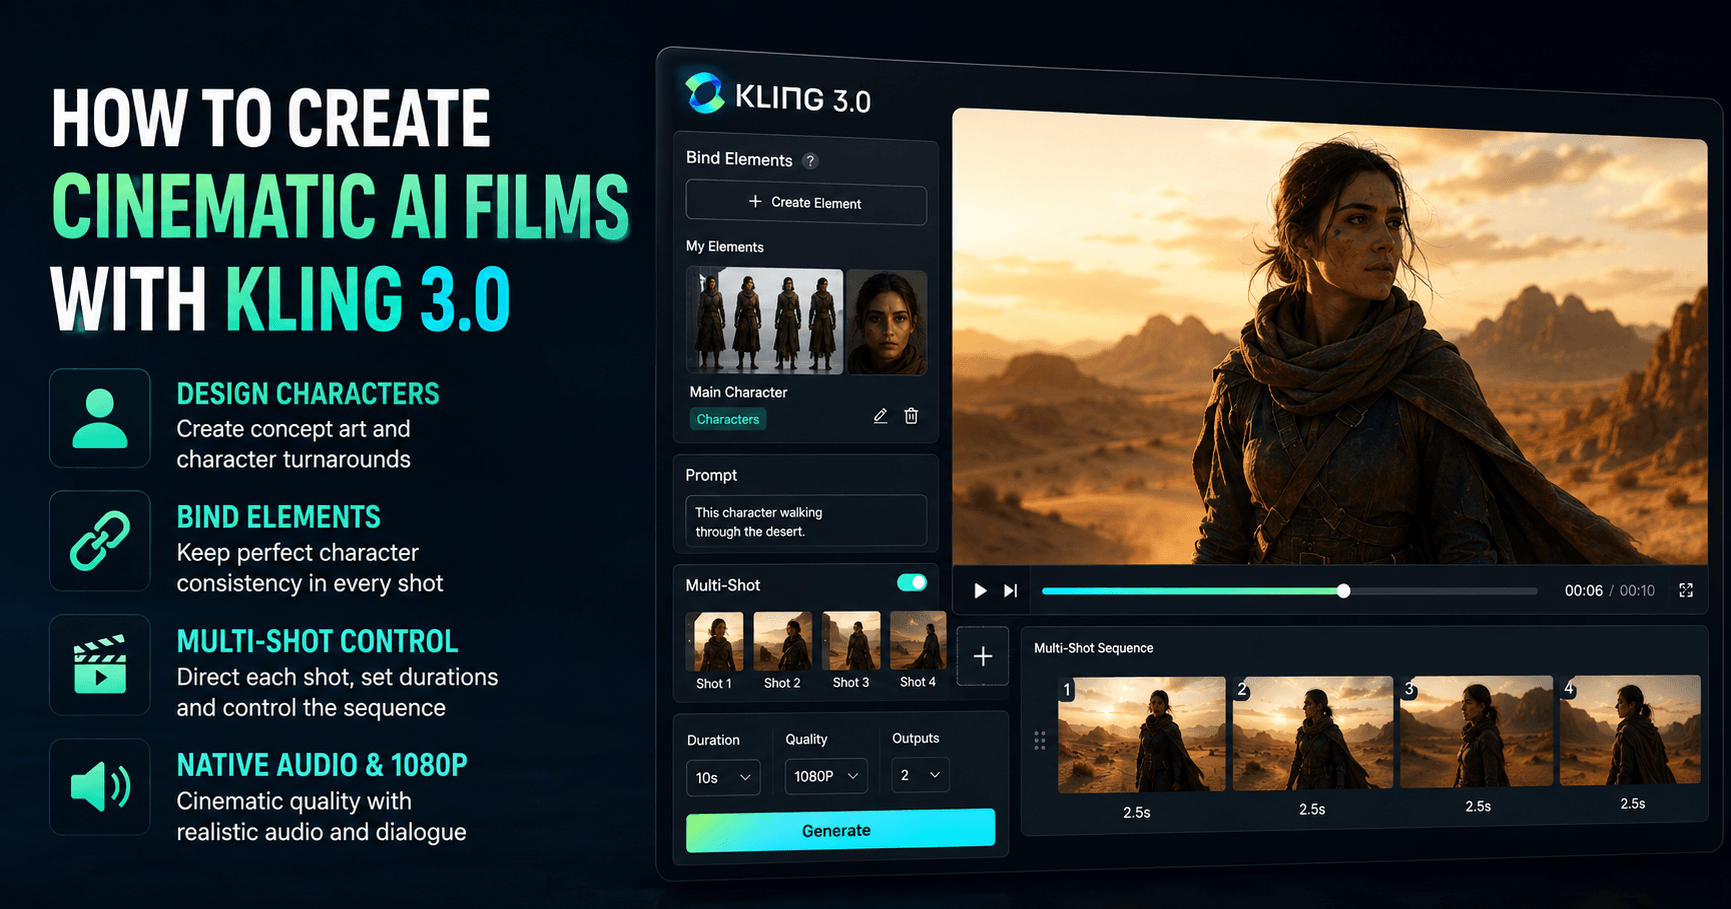

Kling 3.0 is one of the most powerful AI video models for creators who want to produce cinematic videos, short films, commercial scenes, and character-driven stories. It offers strong visual realism, better prompt understanding, improved character consistency, multi-shot control, native audio, and high-quality 1080p video generation.
For anyone creating AI films, Kling 3.0 is especially useful because it gives you more control over the entire process. Instead of simply generating random clips from text, you can design a character, keep that character consistent, direct each shot, control the camera movement, and build a complete scene with a more professional workflow.
Start with Character Design
A strong cinematic AI video usually starts with a strong character. In this workflow, the entire film is built around one main character, so designing that character correctly is very important.
One useful technique is to add the keyword “concept art” at the end of your character prompts. This helps the AI create more creative and visually interesting designs. After generating the concept art, you can use it as a reference and ask the AI to create a more realistic version of the same character.
Another important keyword is “character turnaround.” This creates a 360-degree character sheet, showing the character from different angles. This is extremely useful because Kling can use these different views as references to keep the character consistent across multiple shots.
Instead of having the character look different in every scene, you give the AI enough visual information to understand the character’s face, outfit, body shape, and overall style.
Use Bind Elements for Consistency
One of the most useful features in Kling 3.0 is Bind Elements. This feature helps you keep the same character consistent throughout your project.
After designing your character, you can go into Kling Video 3.0, open Bind Elements, and create a new element. Then you can upload your character turnaround, a close-up of the character’s face, and a few additional angles.
Next, you name the element, add a short description, and choose a tag such as “character.” Kling also allows you to upload or select a voice, but if your film has no dialogue, you can simply select no voice.
Once the element is created, you can use it across your shots. This makes it much easier to generate different scenes with the same character while keeping the design consistent.
This is very important for AI filmmaking because consistency is one of the biggest challenges. Without a feature like this, the AI may change the character’s face, clothing, hairstyle, or proportions from one shot to another.
Generate Your First Kling 3.0 Video
After creating your character element, you can start generating video scenes. A simple test is to add a start frame of your character and write a prompt describing the action.
For example, you could prompt the character walking through a desert. Then you turn on multi-shot, choose the quality, select the length of the clip, decide how many outputs you want, and choose whether to generate audio with the video.
Although Kling 3.0 can generate clips up to 15 seconds, shorter clips often produce better results. Around 10 seconds tends to be a strong balance between cinematic length and visual stability.
Kling 3.0 performs especially well with realism, cinematic quality, emotional expression, subtle movements, and detailed acting. This makes it a strong tool for character-driven scenes where facial emotion and body language matter.
Native Audio and Dialogue Control
Kling 3.0 also includes upgraded native audio. This helps when you have characters speaking in a scene. The model can better understand which character is saying each line, especially when there are multiple characters in one clip.
It also supports a wider range of languages and dialects, which makes it more flexible for creators working on different types of projects.
Even if your film does not include dialogue, native audio can still help with atmosphere, sound effects, and overall scene impact. But for professional results, it is often best to edit the final video with music and sound design after the clips are generated.
Save Presets for Faster Workflows
Another useful feature in Kling 3.0 is the ability to save your settings as presets.
If you find a setup that gives you good results, you can save the current settings and reuse them later. This is helpful when you are working on a bigger project and want to keep the same style, quality, and generation setup across multiple scenes.
Presets can save time and reduce trial and error. Instead of rebuilding the same setup every time, you can quickly return to the settings that already worked.
Directing Scenes with Multi-Shot
One of the best parts of Kling 3.0 is the amount of control it gives you over scene direction.
When you turn on multi-shot, you can use custom multi-shot mode to give specific instructions for each shot in your sequence. This means you can control the composition, action, timing, and camera direction of each part of the video.
For example, you can create a sequence like this:
A wide shot showing the character walking through the desert
A closer shot showing the character’s face
A side angle showing movement through the environment
A final dramatic shot with strong lighting and atmosphere
You can also set the length of each shot and reorder the shots by dragging them into the right sequence.
A useful trick is to start the next shot with the same action that ended the previous shot. This gives the final edit a smoother flow and makes the sequence feel more natural.
For example, if one shot ends with the character turning around, the next shot can begin with that same turn from a different camera angle. This creates continuity and makes the video feel more professionally directed.
Think Like a Film Director
To get the best results from Kling 3.0, you should not only think like a prompt writer. You should think like a director.
That means planning the scene before generating it. Think about the mood, the camera angle, the character’s emotion, the movement, the lighting, and the transition between shots.
Instead of writing a simple prompt like:
A woman walking in the desert.
You can write something more cinematic:
A wide cinematic shot of a lone woman walking through a vast desert at sunset. Her cloak moves in the wind as she looks toward the horizon. The lighting is warm and dramatic, with soft dust in the air and a slow camera push forward.
This gives Kling much more direction. The more clearly you describe the scene, the better the model can understand your creative intention.
Editing the Final Film
After generating all the clips and scenes, the final step is editing. Kling can create beautiful shots, but the final cinematic feeling often comes from how you connect those shots together.
You can edit the generated clips with music, sound design, pacing, color adjustments, and transitions. This is where the project starts to feel like a real short film instead of a collection of AI-generated clips.
Good editing can make a huge difference. Even simple clips can feel more powerful when they are placed in the right order with the right sound and rhythm.
Why Kling 3.0 Is Useful for AI Filmmaking
Kling 3.0 is valuable because it combines several important features in one workflow:
Character consistency
Bind Elements
Multi-shot direction
1080p video generation
Clips up to 15 seconds
Native audio
Camera and scene control
Saved presets
Realistic acting and emotion
These tools make it easier for creators to move from simple AI video experiments to more structured cinematic projects.
Instead of generating one disconnected clip at a time, Kling 3.0 allows you to build scenes with characters, continuity, and direction.
Final Thoughts
Kling 3.0 is a powerful tool for creating cinematic AI films and videos. Its strongest advantage is control. You can design a character, bind that character as an element, generate consistent shots, direct multi-shot sequences, and edit everything into a polished final video.
The best results come when you plan your scene carefully. Start with a strong character design, use reference images, create a bind element, write clear prompts, and use multi-shot mode to control the flow of the scene.
Kling 3.0 does not replace creative direction. It works best when the creator guides it with intention. When used properly, it becomes a powerful filmmaking tool that can help turn simple ideas into cinematic AI videos.


评论0
请登录后发表评论。