
Kling 3.0 is becoming one of the most interesting AI video tools for creators who want more control over cinematic scenes, characters, camera movement, and storytelling. While older AI video models could already generate impressive clips, Kling 3.0 brings stronger prompt understanding, better visual consistency, and new ways to build multi-shot scenes from a single idea.
This makes it especially useful for people who want to create short films, YouTube videos, cinematic scenes, character-based stories, or image-to-video content.
Getting Access to Kling 3.0
You can access Kling 3.0 directly through the official Kling platform or through tools that integrate the model, such as OpenArt. In the tutorial, OpenArt is used because it offers a clean interface and gives access to different video generation models in one place.
Inside the tool, you can choose between models such as Kling 3.0 and Kling 3.0 Omni. The Omni version is especially important because it supports multimodal references, which means you can upload multiple images and use them as visual guides for your video.
Main Features of Kling 3.0
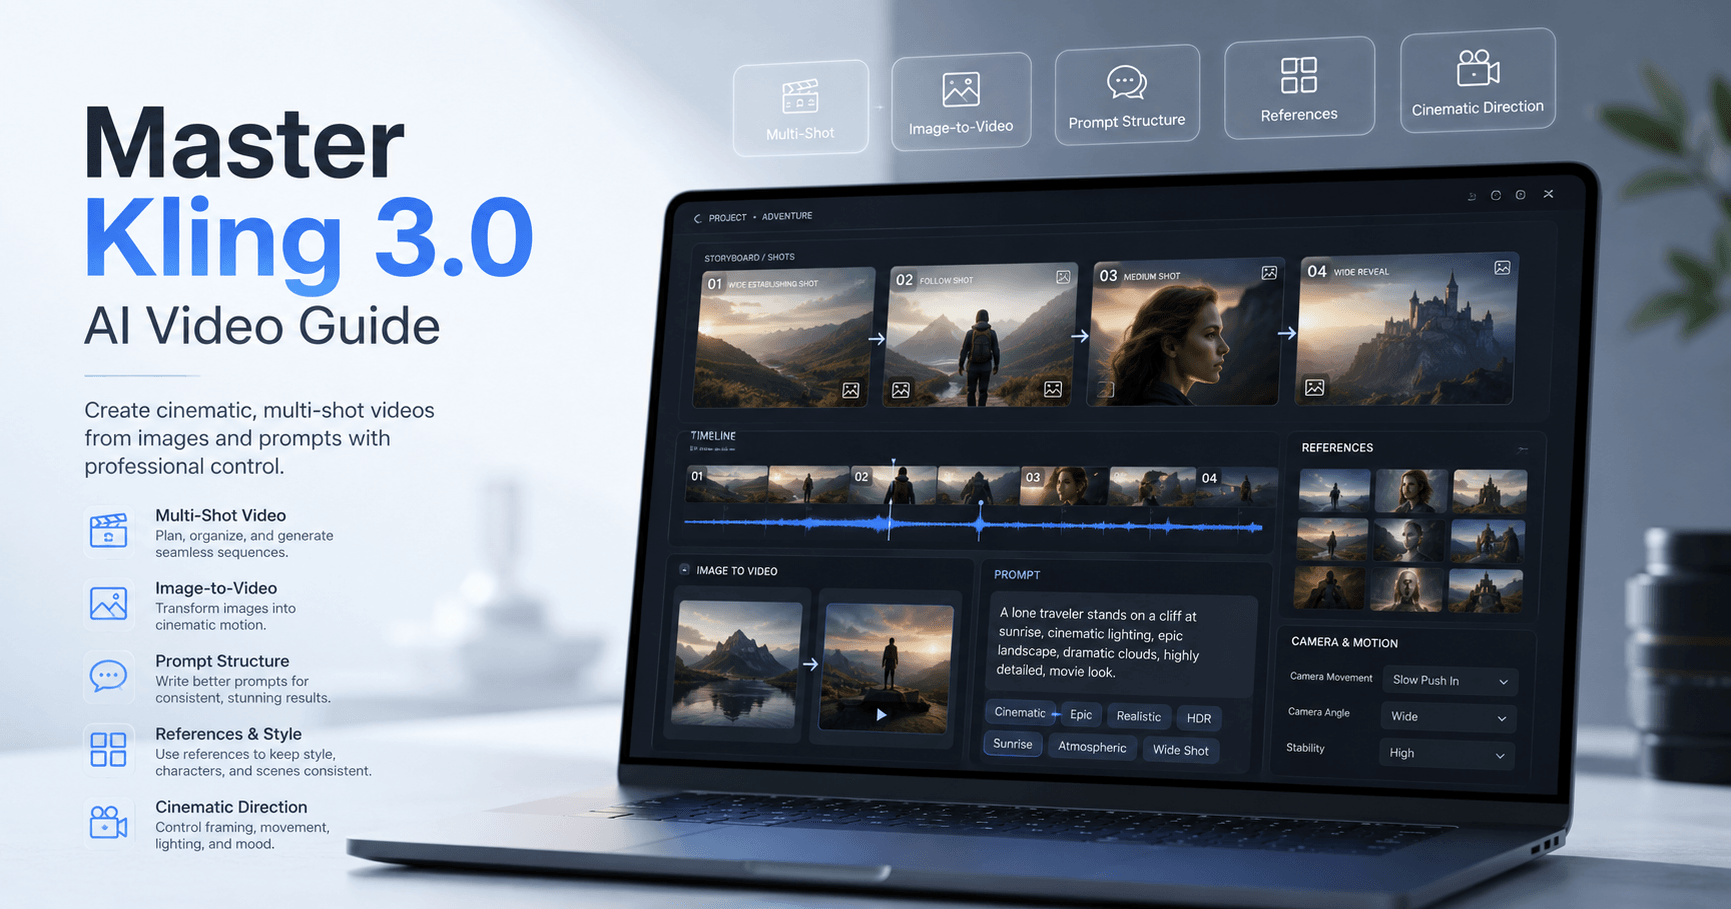
One of the biggest upgrades in Kling 3.0 is the ability to work with multi-shot videos. Instead of generating only one continuous scene, you can now create several different shots inside the same video.
For example, you can create a scene with:
A wide opening shot
A close-up of a character
An over-the-shoulder angle
A reaction shot
A final dramatic frame
This gives creators more control and makes the result feel closer to real filmmaking.
Kling 3.0 also allows videos up to around 15 seconds, depending on the settings. This is useful, but it also has some limitations. Longer videos can create more glitches, especially with lip sync and character movement.
How to Structure a Good Kling Prompt
A good prompt is one of the most important parts of getting a strong result. The transcript explains a simple structure that works well for Kling 3.0.
A strong prompt can include:
Camera style
Subject
Action
Environment
Lighting
Texture
Audio or dialogue
For example, instead of writing a vague prompt like “a woman walking in a hallway,” you can make it more specific:
A medium tracking shot of a nervous woman walking slowly through a dark hallway. She looks over her shoulder while the lights flicker. The scene has cinematic lighting, soft shadows, realistic textures, and tense background audio.
This kind of structure helps Kling understand not only what should appear in the scene, but also how the scene should feel.
Why Multi-Shot Is Powerful
The multi-shot feature is one of the strongest parts of Kling 3.0. It allows you to describe multiple camera angles and actions inside one video while keeping the character and environment more consistent.
In older workflows, creators often had to generate several separate clips, each with different prompts and references. That made consistency harder. Characters could change appearance, locations could shift, and the scene could feel disconnected.
With Kling 3.0 multi-shot, you can use one reference image and generate different angles of the same character. This makes it easier to create a scene that feels like it was directed with intention.
The key is to think like a director. Before generating, decide what each shot should show. Ask yourself:
What is the first image the viewer should see?
When should the camera move closer?
Where should the cut happen?
What emotion should the character show?
What action should end the scene?
This mindset helps you get much better results than simply asking the AI to “make a cool video.”
Using AI to Improve Your Prompts
The transcript also talks about meta prompting. This means using another AI tool, such as ChatGPT or Claude, to help write or improve your Kling prompt.
This can be useful, especially if you are new to AI video generation. You can upload a reference image, describe the idea, and ask the AI to create a structured prompt for Kling 3.0.
However, the best results still come when you review and edit the prompt yourself. AI can help organize the idea, but you should still decide what you actually want to see. Otherwise, you are just hoping the tool guesses correctly.
Professional creators often use AI to draft prompts, but they still rewrite details, adjust camera language, and refine the scene before generating.
Text-to-Video
Text-to-video is the simplest way to use Kling 3.0. You write a prompt, choose your settings, and generate a video.
This method is fast and easy, but it gives you less control. If you run the same prompt multiple times, you may get very different results each time.
Text-to-video is useful when you want to experiment quickly or when you do not need a very specific character or scene. But if you need consistency across multiple clips, it is usually better to use image references or start frames.
Reference-to-Video
Kling 3.0 Omni allows you to use multiple visual references. You can upload images of characters, locations, objects, or animals and refer to them inside the prompt.
For example, you can upload:
One image of the main character
One image of a second character
One image of a location
One image of a dog or object
Then, in the prompt, you can describe how each reference should appear in the scene. This gives you more control over the final result.
The transcript explains that using multiple angles of the same character can help the AI understand the character better. For example, you can provide a front view, side view, and back view. This may reduce glitches and improve consistency.
Still, references are not perfect. The more references you add, the harder it becomes for the AI to keep everything accurate. Complex scenes with many characters and objects can still produce strange errors.
Image-to-Video
Image-to-video is described as one of the most useful and reliable methods in Kling 3.0. This is when you upload a start frame and ask the AI to animate it.
This method gives more control because the AI already knows how the first frame should look. It only needs to create the motion from that point.
You can also use an end frame if you want the video to finish in a specific way. This is helpful when you need a character to move from one position to another or when you want a scene to end on a certain visual moment.
Another useful workflow is to export a frame from a generated video and use it as the start frame for the next clip. This allows you to create longer sequences while keeping the visual style more consistent.
When Kling 3.0 Works Best
Kling 3.0 performs especially well with cinematic shots, emotional expressions, character reactions, camera movements, and image-to-video scenes.
One of its strongest points is prompt coherence. It can understand complex scene instructions better than some earlier models. It can also maintain character details, background elements, and camera direction across different shots.
This makes it a strong option for creators who want to build short dramatic scenes, action moments, animated sequences, or dialogue-based videos.
Limitations of Kling 3.0
Even though Kling 3.0 is powerful, it is not perfect.
One of the main limitations is lip sync. According to the transcript, lip sync often becomes less accurate after around 10 seconds. For this reason, it is better to place important dialogue in the first 10 seconds and use the remaining time for actions, reactions, or camera movement.
Another limitation is morphing. In longer or more complex scenes, faces, objects, hands, or bodies may start to change in strange ways. This happens more often when the prompt is too complex or when the video is too long.
A good solution is to keep scenes shorter, simplify prompts, and avoid forcing too many actions into one generation.
Best Tips for Better Kling 3.0 Results
The most important tip is to think like a director. Do not only describe what is in the scene. Describe how the scene should be filmed.
Use clear camera language.
Keep actions focused.
Use references when consistency matters.
Use image-to-video for more control.
Keep dialogue within the first 10 seconds.
Avoid overly complex scenes with too many characters.
Break long ideas into shorter clips.
Review and rewrite AI-generated prompts before using them.
The better your direction, the better Kling 3.0 can perform.
Final Thoughts
Kling 3.0 is a strong AI video model for creators who want to make cinematic and more controlled videos. Its multi-shot feature, image-to-video workflow, and improved prompt understanding make it a useful tool for short films, faceless YouTube content, social media videos, and creative storytelling.
It still has limitations, especially with lip sync, long videos, and complex reference scenes. But when used with clear prompts, short scenes, and good visual references, Kling 3.0 can produce impressive results.
The best way to use it is not to let the AI guess everything. Instead, guide it like a director. Plan the shots, define the camera, control the action, and use references when needed. That is where Kling 3.0 becomes much more than a simple video generator. It becomes a creative tool for building scenes with intention.


Comentários0
Faça login para comentar.