Automation can feel complicated when you are just getting started. There are triggers, apps, APIs, credentials, workflows, and many tools to connect. But n8n makes this process easier by giving you a visual way to build automations without needing complex code.
n8n works like a digital assistant. You tell it what should start the process, then choose what should happen next. The starting point is called a trigger. A trigger can be a form submission, a new email, a new YouTube video, or a new row added to a spreadsheet. After that, you add actions. These actions can update Google Sheets, send emails, add information to Notion, notify a team on Slack, or use AI to generate replies and summaries.
The idea is simple: instead of doing repetitive tasks manually, you build a workflow once and let n8n handle it automatically.
What Can You Do With n8n?
n8n can connect many apps and services. For example, when you publish a new video on YouTube, a workflow could automatically share the link on X, send an email to your subscribers, add the video details to Google Sheets, and notify your team on Slack.
You can also use n8n with AI for automatic email replies, customer support chatbots, meeting summaries from Zoom transcripts, content idea generators, and internal business workflows.
The best part is that workflow ideas depend on your needs. You can use n8n for personal tasks, business operations, content creation, marketing, customer support, or team communication.
Installing n8n
There are a few ways to use n8n. One option is the official cloud version, which is easy but can become expensive depending on the plan. Another option is self-hosting it on your own computer, but this is not always ideal because your computer needs to stay on all the time.
A more flexible option is hosting n8n on a VPS, which means a virtual private server. This lets you run n8n online without depending on your personal computer. In the tutorial, the setup is done using Hostinger, where n8n can be installed directly during the VPS setup.
After choosing a VPS plan, you select the server location closest to you, choose n8n as the application, complete the setup, and access the n8n dashboard. Once the installation is complete, you create an owner account, activate your free license key, and start building workflows.
Understanding the n8n Dashboard
The n8n dashboard is simple once you understand the main sections.
The Workflows section is where your automations are created and stored. This is where you can start from scratch and build a new workflow.
The Credentials section is where you connect your apps. A credential is usually an API key or account connection that allows n8n to communicate with tools like Google Sheets, Gmail, Notion, Google Drive, and other services.
The Executions section shows the history of your workflow runs. This is useful when something does not work as expected because you can check what happened in each step and debug the problem.
For beginners, the most important areas are Workflows and Credentials. Once your apps are connected, building workflows becomes much easier.
Using n8n Templates
One of the best features for beginners is the template library. n8n has many ready-made workflow templates, including simple automations and advanced AI workflows.
You can browse templates by category, search for apps like Gmail or Notion, or filter by AI-related workflows. Each template usually shows what it does, which apps it connects to, and whether it is free.
Templates are helpful because you do not need to build everything from zero. You can import a workflow, study how it works, and adjust it for your own needs. Some templates also include setup instructions, which makes them easier to follow.
Even if you plan to build your own automation, templates are a great way to learn how n8n workflows are structured.
Setting Up Credentials
Before building a serious workflow, you need to connect the apps you want to use. In the tutorial, Notion is used as an example.
To connect Notion, you create a new internal integration inside Notion, copy the internal integration secret, and paste it into n8n as a credential. After that, you choose which Notion pages n8n can access.
This step is important because n8n cannot update your Notion pages, Google Sheets, Gmail account, or other apps unless you give it permission. Credentials are what allow n8n to safely communicate with those services.
For Google apps, such as Sheets, Drive, and Gmail, the setup process is slightly different, but the idea is the same. You connect the account, give the required permissions, and then use those services inside your workflow.
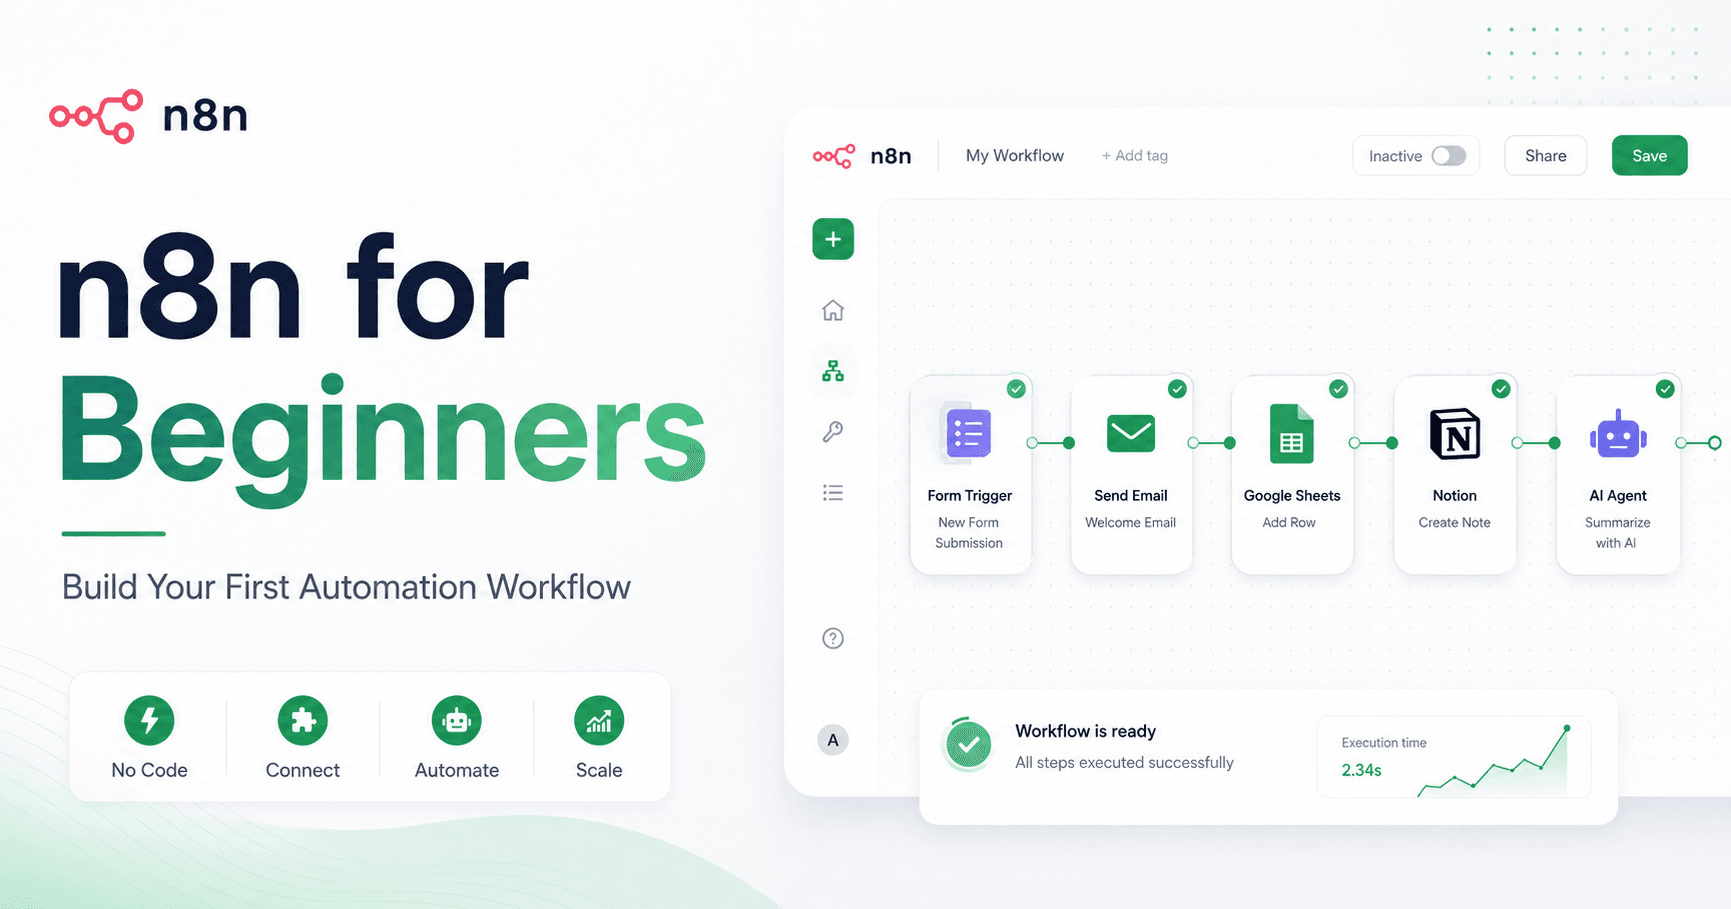
Building Your First Workflow
The example workflow in the tutorial is built around a content idea form. The goal is to collect video ideas from subscribers, save them in Google Sheets, filter them by topic, organize them in Notion, send a thank you email to the person who submitted the idea, and notify the owner by email.
This may sound complex, but in n8n it is built step by step using nodes.
The first node is a form submission trigger. This creates a form where users can submit their first name, last name, email, subject, topic, and description of the idea.
The topic field uses a dropdown with options like WordPress, e-commerce, and SEO. Some fields are marked as required, such as first name, email, subject, topic, and description. After the form is submitted, n8n stores the data and makes it available for the next steps.
A useful beginner tip is to pin the test data after submitting the form. This lets you test the rest of the workflow without filling out the form again every time.
Saving Data to Google Sheets
After the form trigger, the next step is adding a Google Sheets node. This node appends or updates a row in a spreadsheet.
The form fields are mapped manually to the spreadsheet columns. For example, first name goes to the first name column, email goes to the email column, subject goes to the subject column, and so on.
The workflow can also use the email as the matching column. This means that if the same person submits another idea with the same email, the existing row can be updated instead of creating duplicate entries.
This is a simple but powerful way to organize incoming information automatically.
Filtering Submissions
Next, the workflow uses a filter node. In the example, the filter removes ideas with the topic SEO. This means only WordPress and e-commerce ideas continue through the workflow.
Filters are useful when you want your automation to make decisions. You can use them to ignore certain submissions, only continue when a condition is true, or separate useful data from irrelevant data.
For beginners, this is one of the most important concepts in n8n. A workflow does not always have to treat every submission the same way. You can control what happens based on the information received.
Splitting the Workflow With a Switch
After filtering, the workflow uses a switch node. A switch lets you split the automation into different paths.
In the tutorial, one path is for WordPress ideas and another path is for e-commerce ideas. If the submitted topic is WordPress, the workflow follows the WordPress path. If the topic is e-commerce, it follows the e-commerce path.
This makes the workflow smarter. Instead of sending all ideas to the same place, n8n can organize them based on category.
Updating Notion Pages
Once the workflow is split, each path updates a different Notion page. WordPress ideas go to a WordPress video ideas page, and e-commerce ideas go to an e-commerce video ideas page.
The Notion node appends new blocks to an existing page. It can add the person’s name, email, subject, and description of the idea.
This is a practical example of how n8n can turn form submissions into organized content inside your workspace. Instead of copying and pasting ideas manually, everything is added automatically.
Sending Automatic Emails
The workflow also sends a thank you email to the person who submitted the form. This is done with a Gmail node.
The email address is taken directly from the form submission. Then the workflow sends a message thanking the person and sharing helpful links related to their topic.
This creates a better experience for the user because they receive an immediate response. It also saves time because you do not have to send replies manually.
After both topic paths are complete, the workflow uses a merge node to bring the paths back together. Then a final Gmail node sends an email to the owner, letting them know that a new video idea has been submitted.
Why n8n Is Great for Beginners
n8n is powerful because it teaches automation visually. You can see each step, test each node, check the input and output, and understand how data moves through the workflow.
For beginners, this makes automation less intimidating. You do not need to understand everything at once. You can start with a simple trigger and one action, then slowly add filters, switches, emails, and AI features.
The more workflows you build, the easier it becomes. At first, it may feel like there are many options, but after a few examples, the structure becomes clear.
Every automation follows the same basic idea: something happens, n8n receives the data, and then it performs the actions you choose.

Komentar0
Silakan masuk untuk meninggalkan komentar.